Create original Tool for Processing 3.0.2
basically, how to create Processing 3.0.2 Tool is the same as 2.x
Environment
- Windows 10 (64 bit)
- Eclipse (Mars)
- Processing 3.0.2
- JDK 1.8 (Java SE 8)
- processing-tool-template(from GitHub)
Step
Download the zip: processing-tool-template (v3.0.2) https://github.com/processing/processing-tool-template/releases (version is 3.0.2 ...maybe go well !!!)
Eclipse: new Java Project ("testTools": my case) -> import archive file (zip)
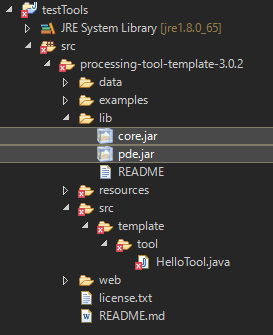
Copy core.jar & pde.jar -> Paste in : {your project name}>src>processing-tool-templates-3.0.2>lib
- core.jar (Processing-3.0.2>core>library)
- pde.jar (Processing-3.0.2>lib)

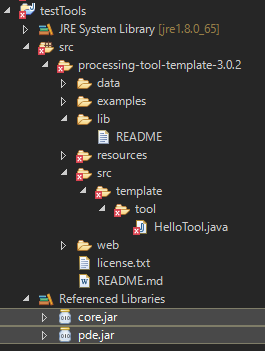
right click on core.jar & pde.jar -> Build Path>Add to Build Path (seemed to move)

Edit build.properties (src>processing-tool-templates-3.0.2>resources)
path is my case- sketch book path (Default: ${user.home}\Documents\Processing)
- sketchbook.location=${user.home}\Documents\Processing3
- core.jar path
- classpath.local.location=${user.home}\Downloads\PROGRAM\Processing\processing-3.0.2\core\library
- libraies path (Default: ${sketchbook.location}/libraries)
- classpath.libraries.location=${sketchbook.location}/libraries
- java.target.version=1.8
- (if you want) other property: Tool name, Author, Your URL ...
- sketch book path (Default: ${user.home}\Documents\Processing)
Ant build (Eclipse)
- show Ant tab
- Eclipse: Window>show View>other -> click Ant -> Ant tab appear (int the lower window)
- build.xml (src>resources) -> drag & drop in Ant tab -> close Processing (while building)
- push Run button in Ant tab -> watch console (build finished in about 5 sec)
- if (BUILD SUCCESSFUL) -> HelloTool is in Processing (PDE), else check build.properties and .jar file
- show Ant tab
Let's edit
HelloTool.java (src>processing-tool...>src>template>tool>HelloTool.java)
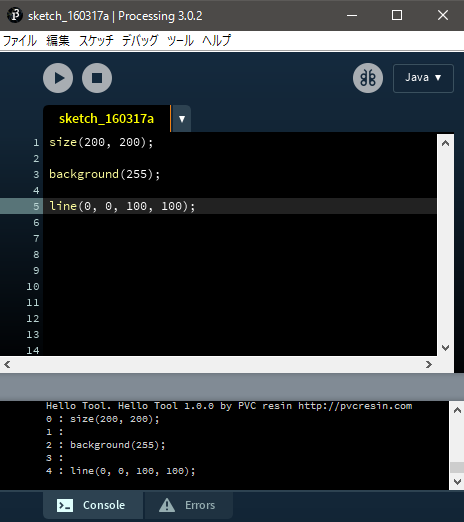
example : when you select the HelloTool, print all your code in PDE
package template.tool;

import processing.app.Base;
import processing.app.tools.Tool;
import processing.app.ui.Editor;

public class HelloTool implements Tool { // class name = project.name (build.properties)
  Base base;

  public void init(Base base) {
    this.base = base;              // Store a reference to the Processing application itself
  }

  public String getMenuTitle() {   // displayed with tools list
    return "##tool.name##";
  }

  public void run() {
    Editor editor = base.getActiveEditor();   // Get the currently active Editor to run the Tool on it

    System.out.println("Hello Tool. ##tool.name## ##tool.prettyVersion## by ##author##");    // <- build.property

    for (int i = 0; i < editor.getLineCount(); i++){
        String s = editor.getLineText(i);
        System.out.println(i + " : " + s);
    }
  }
}

EclipseでProcessing 3.0.2 を動かす話
ProcessingはJavaで出来ているのは有名な話.
ちょっと気になったので今更ながらいつもはJavaを書くのに使っているEclipse(java Mars)でProcessing3.0.2を動かしてみた.
ちなみにProcessing3.0からSettingsにsize()を書かなきゃいけないとかの変更があったようなので,要注意.
やることとしてはEclipseにProcessing>core>libraryにある.jarを雑に全部インポートして,ビルドパスに追加するだけ.
ちょっと詰まった点としては,パッケージ内にクラスを作ったので,main関数のPApplet.mainに”HelloProcessing”ではなく”firstProcessing.HelloProcessing”を渡すってことを忘れてたこと.
ちなみにP3Dとかも一応動いた.

補足 Processing独自の型でcolor型がありますが,これは中身がintとして扱われている. なので例えばこんな感じで書く→int c = pApplet.color(pApplet.random(255));
導入の参考: d.hatena.ne.jp
コードの参考: tkitao.hatenablog.com
color型の参考: ayato.hateblo.jp
KotlinをAndroid Studioで書いて,アプリもビルドしてみる
Kotlinを触り,泥スタでアプリをビルドしてみるまで
Kotlinとは
- Kotlin Kotlin Programming Language
- Swiftっぽいで有名?なプログラミング言語
- Java仮想マシンで動く
- javaのnull pointer exceptionが出づらい設計になっている
- JetBrains社が開発しているからIntelliJベースのAndroid Studioでのサポートも完璧
- Open source
- 拡張子は.kt
- jsにもコンパイルできるらしい
2011年の発表なのでScalaやGroovyに比べ新米だが,面白そうな言語ではあると思う
Swiftとの比較もよくされるので検索してみると面白いかもしれない
Javaのライブラリなどを使えるので便利
KotlinがAndroidでのキラー言語になりえそうだ個人的には感じている
Kotlinに触れる
気になった人はとりあえずオンラインで試すのが良さそう
というのも頻繁にアプデが起こってるので,オンラインのエディタで試すのが一番無難っぽい
今回はAndroid Studio(IntelliJ IDE)で動かして見たのでメモ
Kotlinを泥スタ(Android Studio)で使うには
File > Settings > PluginsからInstall JetBrains plugin...をクリックし,kotlinと検索してインストール
執筆時にはKotlinとKotlin Extensions for Androidがあるので両方入れちゃう
一つ目はKotlinをかけるようにするやつで,もう一つはAndroidを書くときに楽できるやつらしい
実際に書いてみる
MainActivityと同じ所にfirst.ktを作ってみる
あまり使ったことなかったけど,泥スタでは一つのファイルだけをコンパイルする的なことが出来るので
Hello, world!のコードをさっき紹介したOnlineのエディタからコピペして右クリック>Run(...first.kt)を実行
するとRunのコンソールにHello, world!が表示される
わーいさすがJetBrains 5分もかからずKotlinが動かせた!
Onlineよりこっちのほうが好きなので,練習するのには泥スタを使った
すごく学びやすい言語だなぁといった印象
MainActivity.javaを.ktに変換!
よし,学んだしMainActivityをKotlinで書き換えるか!と思った矢先,一発で変換できることに気づいてしまった
やっぱ楽したいじゃん?ということでMainActivity.javaを選択し,
Code > Convert Java File to Kotlin File を押すとMainActivity.ktの出来上がり!早っ!
Extensionは今回使用してないがそれでもなんとなくコードが短くなって見やすくなった気がする?
あとはいつもの感じでビルドすると動く
まとめ
Kotlinでアプリ開発が絶対楽になると思う
これからはKotlinでしょと言えるようにより深く学んでいく所存
これからが楽しみ
参考:
VirtualBoxで"VT-x is not available"のエラーが出た時の解決策
Genymotionで新しいデバイス作って起動しようとルンルンしていたら起動しなかった
ので直接VirtualBoxから起動しようとしたら"VT-x is not available"というエラーが...
検索してみるとどうやら仮想化システムHyper-Vが悪さをしているらしい
コントロールパネル>プログラム>Windowsの機能の有効化または無効化 でHyper-Vのチェックボックスを外したら起動した
参考:Wonderlands in Usagi's brain: VirtualBoxを使おうとして"VT-x is not available"とエラーが出た原因はHyper-Vだった落ち
はてなブログ開設しました〜
おもむろにはてなブログ開設してみました〜
めちゃくちゃ書きたいことがあったら書いていく予定。